One the most improved feature in SharePoint 2010 is Client Object Model. It enable client application to interact with SharePoint content directly. In Summary “SharePoint 2010 client object model lets you write client-side code to work with all the common objects in SharePoint sites. Through the object model, you can add and remove lists, add, update, and delete list items, change documents in document libraries, create sites, manage permissions of items, and add and remove Web Parts from a page.”
Client Object Module allows to interact following ways.
1. .NET Managed Client
2. Silverlight
3. JavaScript
In this example you will see .NET Managed client by create WPF application, We will see how to retrieve list from SharePoint site, Create list in SharePoint site and Deleting the list from SharePoint site.
Creating SharePoint Client Object Model WPF Application
1. Open Visual Studio 2010 by going to the Start Menu | All Programs | Microsoft Visual Studio 2010 | Microsoft Visual Studio 2010.
2. From the menu, select File | New | Project.
3. In the New Project dialog window, choose Visual C# | Windows from the Installed Templates.
4. Select WPF Application from the Project Items.

5. In the solution explorer, right click on References and select Add Reference… and Switch to Browse tab.

6. Copy and Paste the following path in the File Name textbox and press enter:
C:\Program Files\Common Files\Microsoft Shared\Web Server Extensions\14\ISAPI
7. Select Microsoft.SharePoint.Client.dll and Microsoft.SharePoint.Client.Runtime.dll
8. In the Solution Explorer, double click on Window1.xaml to open the XAML view.
Retrieve List Values
9. Insert the following XAML code inside the Grid element in the XAML view.
HTML, using GeSHi 1.0.8.8
<ListBox Height="225" HorizontalAlignment="Left" Margin="12,61,0,0" Name="listBox1" VerticalAlignment="Top" Width="274" DataContext="{Binding}" />
<Button Content="Retrive Lists" Height="23" HorizontalAlignment="Left" Margin="298,27,0,0" Name="button1" VerticalAlignment="Top" Width="75" Click="button1_Click" />
<TextBox Height="23" HorizontalAlignment="Left" Margin="64,28,0,0" Name="textBox1" VerticalAlignment="Top" Width="222" />
<Label Content="Site URL" Height="28" HorizontalAlignment="Left" Margin="5,26,0,0" Name="label5" VerticalAlignment="Top" />
Parsed in 0.012 seconds at 46.65 KB/s

10. In the Solution Explorer, right click on Windows1.xaml and select View Code.

11. Add the following using statements :
using Microsoft.SharePoint.Client;
using WPFSP = Microsoft.SharePoint.Client;
12. Double click Retriev List button and Insert the following code block :
C#, using GeSHi 1.0.8.8
private void button1_Click(object sender, RoutedEventArgs e)
{
this.Cursor = Cursors.Wait;
//Set Client Context
WPFSP
.ClientContext context
= new WPFSP
.ClientContext(textBox1
.Text);
Web site = context.Web;
context.Load(site, osite => osite.Title);
context.ExecuteQuery();
Title = site.Title;
ListCollection lists = site.Lists;
IEnumerable<WPFSP.List> listCollection =
context.LoadQuery(lists.Include(l => l.Title, l => l.Id));
context.ExecuteQuery();
listBox1.ItemsSource = listCollection;
listBox1.DisplayMemberPath = "Title";
}
13. Press F5 to start debugging the application.
14. You will see the Application Window with Enter the site Name and Click Retrieve list button System will populate the available SharePoint lists.

Creating List via Client Object Module
We will extended the same client Application to create list
15.Insert the following XAML code inside the Grid element in the XAML view.
HTML, using GeSHi 1.0.8.8
<Button Content="Create Lists" Height="23" HorizontalAlignment="Right" Margin="0,295,19,0" Name="button2" VerticalAlignment="Top" Width="75" Click="button2_Click" />
<TextBox Height="23" HorizontalAlignment="Left" Margin="86,296,0,0" Name="textBox2" VerticalAlignment="Top" Width="208" />
<Label Content="List Title" Height="28" HorizontalAlignment="Left" Margin="7,296,0,0" Name="label1" VerticalAlignment="Top" />
<Label Content="Description" Height="28" HorizontalAlignment="Left" Margin="6,323,0,0" Name="label2" VerticalAlignment="Top" />
<TextBox Height="23" HorizontalAlignment="Left" Margin="86,323,0,0" Name="textBox3" VerticalAlignment="Top" Width="208" />
<ComboBox Height="23" HorizontalAlignment="Right" Margin="0,353,98,0" Name="comboBox1" VerticalAlignment="Top" Width="208" ItemsSource="{Binding}">
<ComboBoxItem Content="Generic List" />
<ComboBoxItem Content="Announcements" />
<ComboBoxItem Content="Events" />
</ComboBox>
<Label Content="List Template" Height="28" HorizontalAlignment="Left" Margin="5,348,0,0" Name="label3" VerticalAlignment="Top" />
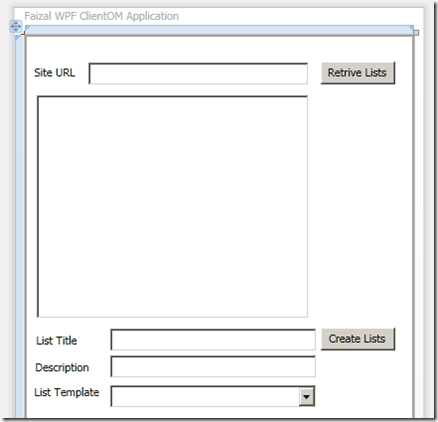
16. You should see the added items on the designer view
17. Double click Create Lists button and Insert the following code block :
C#, using GeSHi 1.0.8.8
private void button2_Click(object sender, RoutedEventArgs e)
{
// Site Collection URL
ClientContext createContext
= new ClientContext
(textBox1
.Text);
// Retrieve Sites
Web mySite = createContext.Web;
// Rettrive Lists Collections....
ListCollection lists = mySite.Lists;
//List Create Information which hold list Title, Description and Template Type
ListCreationInformation listCreationInfo =
new ListCreationInformation
();
string listType = comboBox1.Text;
switch (listType)
{
case "Generic List":
{
listCreationInfo.TemplateType = (int)ListTemplateType.GenericList;
break;
}
case "Events":
{
listCreationInfo.TemplateType = (int)ListTemplateType.Events;
break;
}
case "Announcements":
{
listCreationInfo.TemplateType = (int)ListTemplateType.Announcements;
break;
}
}
// Assign value to list
listCreationInfo.Title = textBox2.Text;
listCreationInfo.Description = textBox3.Text;
// Create List
mySite.Lists.Add(listCreationInfo);
createContext.ExecuteQuery();
}
18. Press F5 to start debugging the application.
19. You will see the Application Window with Enter the site Name, List Name, Description and Select List Template Type and Finally click Create list button System will create SharePoint list.

20. Go to http://demo2010a:1000/ SharePoint Site View all site content you can able to see the ClientOM Announcements list.
Deleting List via Client Object Module
We will extended the same client Application to Delete list
21.Insert the following XAML code inside the Grid element in the XAML view.
HTML, using GeSHi 1.0.8.8
<Button Content="Delete List" Height="23" HorizontalAlignment="Left" Margin="298,399,0,0" Name="button3" VerticalAlignment="Top" Width="75" Click="button3_Click" />
<ComboBox Height="21" HorizontalAlignment="Left" Margin="86,402,0,0" Name="comboBox2" VerticalAlignment="Top" Width="208" DataContext="{Binding ElementName=listBox1}" />
<Label Content="Select List" Height="28" HorizontalAlignment="Left" Margin="6,400,0,0" Name="label4" VerticalAlignment="Top" />
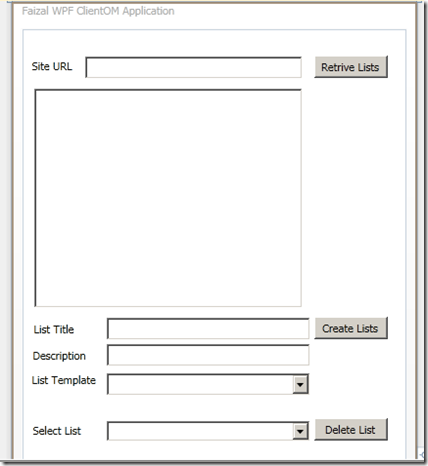
21. You should see the added items on the designer view
22. Double click Retriev List button and Insert the following code block :
comboBox2.ItemsSource = listCollection;
comboBox2.DisplayMemberPath = "Title";
23. Double click Delete List button and Insert the following code block :
C#, using GeSHi 1.0.8.8
private void button3_Click(object sender, RoutedEventArgs e)
{
ClientContext deleteContext
= new ClientContext
(textBox1
.Text);
MessageBox.Show("SharePoint List Deleting " + comboBox2.Text);
deleteContext.Web.Lists.GetByTitle(comboBox2.Text).DeleteObject();
deleteContext.ExecuteQuery();
}
25. You will see the Application Window with Enter the site Name and click Retrieve list button, system will retrieve SharePoint lists and set value to Combo box.

26. Select Value from Combo box and Click Delete List system will delete selected list.
To Download Source code click here
To learn more about Client object model you can refer to Steve Peschka has written a really good series:


